Background
This guide is a practical overview for everyday users of email, covering how to send encrypted emails using the GNU Privacy Guard (GPG) system. For ease of initial use, we will use the graphical implementation of the GPG system offered by GPG Suite software.
Technical Prerequisites
Although this example uses Apple-based (MacOS) software for teaching purposes, graphical software exists for both Mac and Windows to accomplish these same tasks.
- Apple MacOS Catalina, version 10.15.7 or higher
- GPG Suite, version 2022.1 or higher
- Apple Mail (or any OS-native email software that integrates with the GPG system)
Audience Background
This guide assumes that the user has basic familiarity with the MacOS operating system and a working email account that is logged into Apple Mail.
Objectives
At the end of this guide, the user should be able to:
- Generate a new private-public key pair using the GPG software suite.
- Understand the difference between an email “signature” that uses encryption and full encryption of email contents.
- Safely send a signed email, and verify a signature from another user.
- Encrypt the contents of an email with any other user’s public key, and decrypt a message with one’s own private key.
Setting up Key Management Software
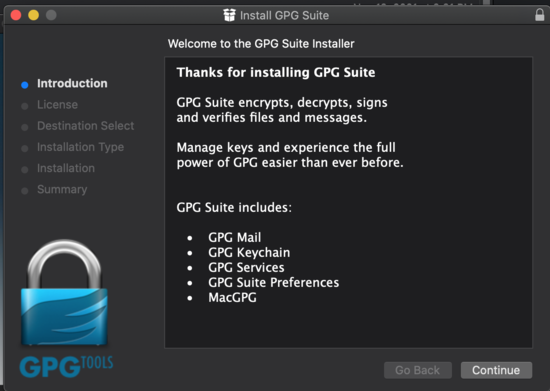
GPG is best introduced through graphical management software that simplifies the creation and management of a public/private keyset. Since this guide is for MacOS, we will use the GPG Suite toolset.
Download the installer and install the full suite of tools, including “Mail” and “Keychain” and all other services.
Create Your First Public Key Set
Once you have installed GPG tools, open up the app for the first time. You should be greeted by a screen that looks something like the following:
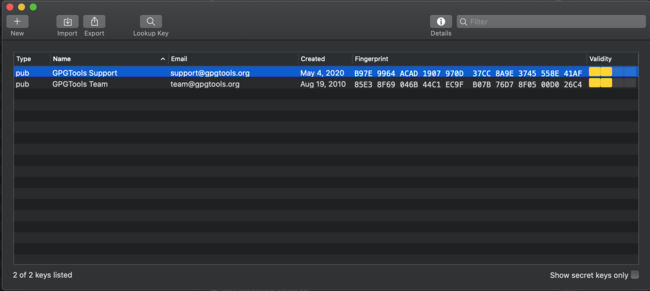
Your fresh installation of GPG tools may come with a few sample keys, which may be useful for you to refer to later as examples. For now, take note of the following attributes listed in the screenshot above. Here are a few considerations associated with each one:
- The left-most column, the key type. Because both of the sample keys in the screenshot (“GPG Tools Support”) and (“GPG Tools Team”) are owned by someone else, you have only their public keys. The same will be true of any other person who shares their public key with you. This is not the case for any key that you create and control: those will listed as a pair that identifies both your public and private keys.
- The name and email fields. PGP encryption relies on the idea of trusted identities.1 The public-private key system ensures that you can read mail that is signed or encrypted by other people. But you can only be confident that another person is who they say they are if you trust the identity (name, email, etc.) attached to the key. It’s therefore very important to stay aware of a key’s identity attributes. Always verify that both the name and email on any key you create are exactly what you expect (e.g., no typos)–and do the same for any public key that comes into your possession from another person, trusted or not.
- Created Date. This piece of metadata should help you judge a key’s authenticity. If I am looking at someone else’s private key, does the date match other things I know about this person’s identity online? For example, a key that was created very recently may be a tip-off that this is not a person’s real key. And if looking at my own key, does the key’s date of creation line up with my record of when it was created?
- Fingerprint. A unique identifier assigned to every public key, and useful for checking against any independent records in your possession.
Taking all these fields together, the big lesson is that a good public-private key system is not a guarantee of privacy. It requires your scrutiny to make sure you are exchanging keys with the right party.
Creating Your First Key
Initial Steps
Let’s create a key! Hit the plus ("+") sign (“New”) on the top-left corner of the GPG Keychain app to create a new public/private key pair. You’ll see a screen similar to the followin0g:
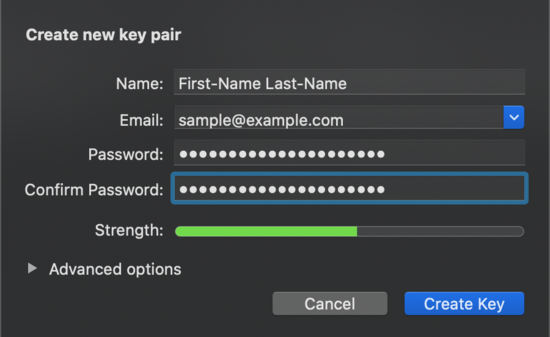
This screen shows dummy values, but if you are trying to create a key associated with your real life identity, you should put enough of your full name to make yourself identifiable to others over the internet. And use an email that is easily associated with the identity to which you want to attach your public key (for example, an email tied to a longtime personal email, or to a custom domain that you control).
Choose these attributes carefully. Once created, it is possible to add additional information, like another username or email address to the key, but existing information cannot be changed without revoking the key and starting over.
Choose these options to get started:
- For key type, choose the default “RSA and RSA” option.
- Select the longest key length allowable, usually 4096 bits.
- Use the default expiration date.
After Creating Your Key
Once you create your new public/private key set, you may be asked if you want to upload your key to a public keyserver. Since this is just a practice key, skip that step for now. You can upload your public key later once you are sure all of its settings are right for your needs.
At this point, you should see your key added to the list of keys in your GPG Keychain:

Your First Email Signature
Now it’s time to do something with your public keys–your first email signature! To summarize: one of the two main cryptographic tasks you can perform with email is to “sign” it. In the paper world, a personal signature is one way to prove that a given individual is responsible for the contents of a document. Each person’s written signature is unique, and in theory it is possible to examine that signature to determine if it is authentic. The signature is a traditional method for proving that you are who you say you are.
Encrypted signatures work on the same principle: your public key is the electronic marker that ties an email to you. As long as the recipient of your email believes that you are who you say you are–that you actually possess the private key used to sign something–then a signature offers good assurance that an email came from you.
Signing: The Basics
Note: for both the signature and encryption exercises below, it is easiest practice by sending an email to yourself. Once you feel comfortable doing this a few times, seek out more realistic practice by finding a partner willing to set up their own public/private key pair and exchange messages with you.
Apple’s default mail program makes it very easy to use the GPG keychain.
- First create a new email, and put the email registered with your just-created GPG key into the “To:” field.
- Once you put in your email, two icons on the right side of in the subject line should become active:

Notice that as soon as you added your email, a blue check mark appears in the above photo. This indicates that your email is now signed. If you’d like, click the blue check on and off a few times. When the email is not signed, a grey “x” appears instead of the check mark.
Type anything in the body of the email, and hit “Send.”
When you receive the email your sent to yourself in your inbox, you will see a new line below the subject in the email:

Note the sender’s name in the signature. If you are receiving a signed email from someone else, make sure the email in their signature is what you expect. Anyone can create a GPG key with an email that looks superficially close to someone else’s. The signature is only as good as your ability to verify that it has exactly the same identity information (email, name) as his or her public key, which you should already have for the purposes of verification.
Encrypted Email
An email is encrypted using a person’s public key. An encrypted email can only be read by the person who has the private key paired with this public key. This is how encryption allows for private communication between sender and receiver. The sender uses the public key to encrypt, and only the recipient possesses the corresponding private key that allows him to decrypt the same message. This might be the most confusing part of the public-private key process, so let us review it from the other direction. If I want to send an encrypted email to you, I find your public key to encrypt the message, and only you have the private key needed to decrypt it.
This differs somewhat from the mechanics of signing an email, and is worth emphasizing yet again: in order for Party A to send Party B an encrypted email, Party A must obtain Party B’s public key. Party B’s public key is what allows Party A to “seal” (encrypt) the message, so that it is readable only by Party B, who uses his or her private key to open it.
For this exercise, you should again use the keys you generated earlier. Create another email in Apple Mail. Be sure to put something in the message body. This time, click the “lock” button before sending the email:

You should receive the message in your inbox shortly, with a “Security” line that says the message has been encrypted.
To simulate what happens when you don’t have the correct private key to decrypt the message, try deactivating your key. Export a copy of the keyset you just created to another folder (the key file should have an .asc extension), and then delete your key from the GPG Keychain suite. Your message should instantly become unreadable within Apple Mail. The subject line can still be read, but the body will be replaced by two files: one with your message body, and one with your public key used to encrypt the email.

Conclusion
That should be all you need to get started with public-key encrypted mail. The next step is to practice under more realistic conditions. These might include:
- Uploading your public key to public key servers, and/or listing them on your social media profiles or website.
- Exchanging signed and encrypted messages with a friend.
- Properly storing and rotating your own public keys.
When the technology first got started in the 1990s, people used to have “key exchange parties” where they would exchange public keys in person. It is still the case that one very direct and reliable method of verifying someone’s public key identity is to obtain his or her public key in a face-to-face meeting. ↩︎